One of the modern ways of deploying is using the Lift-And-Shift Mechanism. There are two deployment strategies used in this case
- Virtual Machines
- Containerization
- Steps to Scaffold Controller with EF Core
- Use Visual Studio Rapid Scaffolding to
- install EF Core,
- create actions,
- create dbContext, using code-first approach
- Create the DB in the Docker Container
- Configure connection string
- Create a Migration Service
- Configure docker-compose.yml
STEPS TO SCAFFOLD CONTROLLER WITH EF CORE
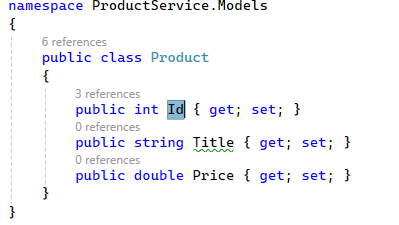
- Create "Models" folder
- Add a class named "Product". This will be your model class, which will become a table when integrated with a DBMS like SQL Server.
- Save your project and Build it.
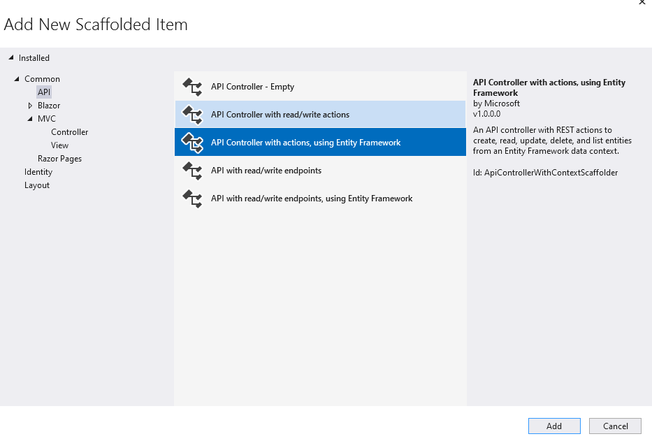
- Right Click on Controllers Folder -> Add -> New Controller -> Choose (API Controller in Left Pane) -> Choose API Controller with Entity Framework Actions

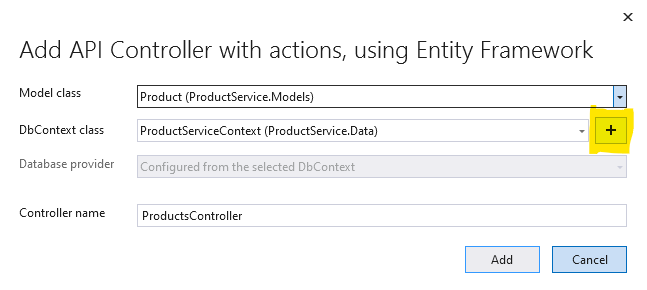
- Click Add. This will install all required EF Core Nuget Packages and auto-generate
- the ProductsController,
- The EFCore DBContext Class named ProductServiceContext,
- app.config settings
To create the DB in the Docker Container, go ahead with the following steps
- Create a migration.
- Build your project
- Set your WebApi project as the Startup project
- Open Package Manager Console, verify that the Web Api project is the default project
- > Add-Migration v1
- Add the following code in the Program.cs file, after the line: var builder = WebApplication.CreateBuilder(args);
var server = builder.Configuration["DbServer"] ?? "localhost";
var port = builder.Configuration["DbPort"] ?? "1433"; // Default SQL Server port
var user = builder.Configuration["DbUser"] ?? "SA"; // Warning do not use the SA account
var password = builder.Configuration["Password"] ?? "sa@12345Ok!";
var database = builder.Configuration["Database"] ?? "ProductsDB";//concatenate them into a connection string
//server, port;Initial Catalog=database;userID=user;password=password
var connectionString = $"Server={server}, {port};Initial Catalog={database};User ID={user};Password={password};TrustServerCertificate=True;";builder.Services.AddDbContext<ProductServiceContext>(options =>
options.UseSqlServer((connectionString)));
- After the line: var app = builder.Build(); ADD THE FOLLOWING
- DbMigrationService.MigrationInit(app);
- Generate the class and replace with the following code
public class DbMigrationService
{
public static void MigrationInit(IApplicationBuilder app)
{using (var serviceScope = app.ApplicationServices.CreateScope())
{
try
{
serviceScope.ServiceProvider.GetService<ProductServiceContext>().Database.Migrate();
}
catch (Exception ex)
{
Debug.WriteLine(ex.Message);
}
}
}
}
- Open docker-compose.yml file. Here we will create a new container that will hold the DB. Now add the following configurations.
- sqldata:
container_name: sqldata
image: mcr.microsoft.com/mssql/server:2019-latest
restart: always
environment:
ACCEPT_EULA: "Y"
SA_PASSWORD: "sa@12345Ok!"
MSSQL_PID: Developer
ports:
- "1433:1433" - Append the following in the productservice configuration in the docker-compose.yml
- environment:
DbServer: "sqldata"
DbPort: "1433"
DbUser: "SA"
Password: "sa@12345Ok!"
Database: "ProductsDB"
depends_on:
- sqldata
- The above configuration should be appended as shown in the screenshot below

- Set the docker-Compose Project as your startup project. Run your application.
No comments:
Post a Comment