Search This Blog

Showing posts with label .net core. Show all posts

Thursday, 3 July 2025

Docker Compose - Web Api connecting to SQL Server container

One of the modern ways of deploying is using the Lift-And-Shift Mechanism. There are two deployment strategies used in this case

  1. Virtual Machines
  2. Containerization
In this post, we shall explore how to use Docker-Compose to containerize Web Apis that use SQL Server DBMS.

USECASE: The concerned web api needs to be deployed on a different server (container) and the DB to be deployed on a different Server (container)

This is a classic case in the deployment architecture of almost every enterprise product.

TOOLKIT:

Containerization : Multi-container in the same sub-net
Tool for Containerization: Docker-Compose

PRODUCT TECHNICAL SPECS:

API Layer: Web Api, .Net 8.0 runtime
DAL Layer: EF Core, .Net 8.0
UI Layer: Out of Scope for this post. It can be MVC Web App, Angular App, React App, even a console app etc.

DETAILS OF WEB API

Name of Api: ProductService
Model Class name: Product
DBContext Name: ProductServiceContext

MIGRATION STRATEGY

Migrating the DB to configured SQL Server Container (container name: sqlData)

This can be accomplished from scratch, in two prominent steps

  1. Steps to Scaffold Controller with EF Core
    1. Use Visual Studio Rapid Scaffolding to 
      1. install EF Core, 
      2. create actions, 
      3. create dbContext,  using code-first approach
  2. Create the DB in the Docker Container
    1. Configure connection string
    2. Create a Migration Service
    3. Configure docker-compose.yml


 STEPS TO SCAFFOLD CONTROLLER WITH EF CORE

  1. Create "Models" folder
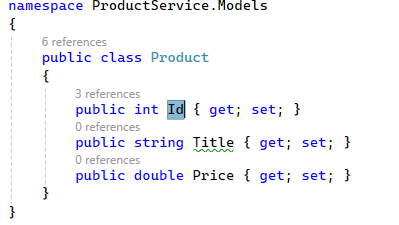
  2. Add a class named "Product". This will be your model class, which will become a table when integrated with a DBMS like SQL Server.
    1. 7fd0ff9a81183c407c8add0949ea94ad.png
  3. Save your project and Build it.
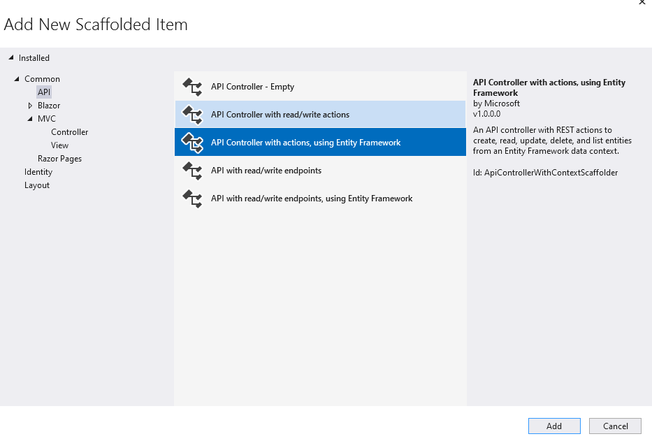
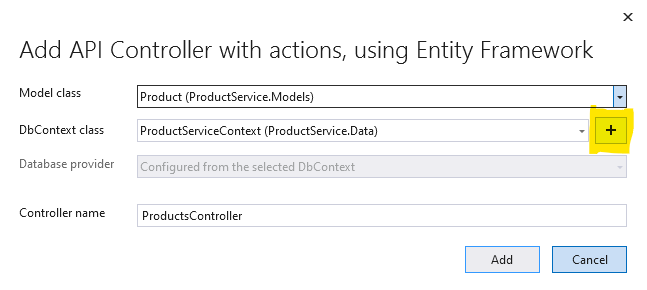
  4. Right Click on Controllers Folder -> Add -> New Controller -> Choose (API Controller in Left Pane) -> Choose API Controller with Entity Framework Actions

    1. bf99c6d4620f8669de07d652f2e872e4.png
    2. 3a7294644c50d0abffffac80cadde245.png
    3. cd3538003f05694f9ae5f31cf4f056f1.png
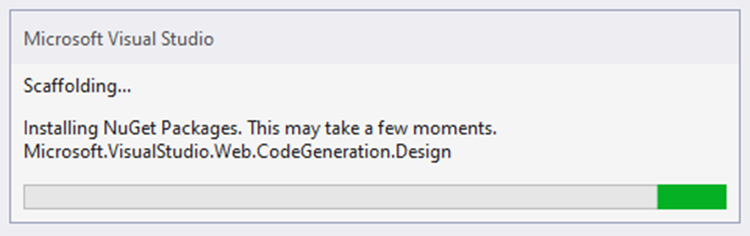
    4. Click Add. This will install all required EF Core Nuget Packages and auto-generate
      1. the ProductsController,
      2. The EFCore DBContext Class named ProductServiceContext,
      3. app.config settings

To create the DB in the Docker Container, go ahead with the following steps


  • Create a migration.
    • Build your project
    • Set your WebApi project as the Startup project
    • Open Package Manager Console, verify that the Web Api project is the default project
      • > Add-Migration v1                           

  • Add the following code in the Program.cs file, after the line: var builder = WebApplication.CreateBuilder(args);

    • var server = builder.Configuration["DbServer"] ?? "localhost";
      var port = builder.Configuration["DbPort"] ?? "1433"; // Default SQL Server port
      var user = builder.Configuration["DbUser"] ?? "SA"; // Warning do not use the SA account
      var password = builder.Configuration["Password"] ?? "sa@12345Ok!";
      var database = builder.Configuration["Database"] ?? "ProductsDB";

      //concatenate them into a connection string
      //server, port;Initial Catalog=database;userID=user;password=password
      var connectionString = $"Server={server}, {port};Initial Catalog={database};User ID={user};Password={password};TrustServerCertificate=True;";


      builder.Services.AddDbContext<ProductServiceContext>(options =>
          options.UseSqlServer((connectionString)));


    • After the line: var app = builder.Build(); ADD THE FOLLOWING
      • DbMigrationService.MigrationInit(app);
      • Generate the class and replace with the following code
        • public class DbMigrationService
          {
              public static void MigrationInit(IApplicationBuilder app)
              {

                  using (var serviceScope = app.ApplicationServices.CreateScope())
                  {
                      try
                      {
                          serviceScope.ServiceProvider.GetService<ProductServiceContext>().Database.Migrate();
                      }
                      catch (Exception ex)
                      {
                          Debug.WriteLine(ex.Message);
                      }
                  }
              }
          }


    • Open docker-compose.yml file. Here we will create a new container that will hold the DB. Now add the following configurations. 
      •  sqldata:
              container_name: sqldata
              image: mcr.microsoft.com/mssql/server:2019-latest
              restart: always
              environment:
                  ACCEPT_EULA: "Y"
                  SA_PASSWORD: "sa@12345Ok!"
                  MSSQL_PID: Developer
              ports:
                  - "1433:1433"
      • Append the following in the productservice configuration in the docker-compose.yml
        • environment:
              DbServer: "sqldata"
              DbPort: "1433"
              DbUser: "SA"
              Password: "sa@12345Ok!"
              Database: "ProductsDB"
          depends_on:
            - sqldata

        • The above configuration should be appended as shown in the screenshot below3314ac5cf19393e23bdf7a8532b93919.png

      • Set the docker-Compose Project as your startup project. Run your application.

Saturday, 1 October 2022

Integration of .Net Web Api with Entity Framework – STEP BY STEP


There are more than one ways of integrating a .Net application with Entity Framework.

In this process, we shall be using

    1. Web Api’s scaffolded template for controller creation
    2.  Code First Approach in Entity Framework

Pre-requisites:

  1.             This integration is done using .Net 6   

                2.  Using Visual Studio 2022

Process

1.      Create a Web Api Core project using C#. File => New Project => Asp.net Core Web API

a.       


2.      The project created should look like this in the solution explorer. Here we have named the project as ForEF.

a.      


3.      Create a new API controller using the scaffolded template for Entity Framework. Right-click on Controllers folder => Add => Controller

a.      


4.      Next choose the API controller => Actions using Entity Framework

a.      


b.      


5.      On clicking add, it should begin installing Entity Framework Code packages from nuget.


a.       


b.      You might get an error as below.

                                                               i.      


c.       In this case, please do the following. Close the dialogs for controller creation. In the solution explorer, Right-Click on Dependencies folder of your project => Manage Nuget Packages

                                                               i.      


d.      You will notice that the missing package is already installed.

                                                               i.      


6.      Open the file WeatherForecast.cs , from the solution Explorer.  This file could be any file that acts as the model for your application. A model file is a file that contains

a.      A default constructor

b.       Only properties

c.       


7.      Add a property to it, and mark it with the [Key] Attribute.

a.      


b.      The property marked with [Key] attribute, will become the primary key in the database table. The model class becomes, the table name while the properties become columns of the table

8.      Now, repeat the steps 3, 4. Your controller should be created successfully.

9.      In the Solution Explorer, find the file called “appSettings.json” and open it. In this file, we will need to provide the Database name as part of “Database” Setting. Please refer screenshot below. Here we have named the database as “ForEF”. Save the file and close.

a.      


10.  To automatically migrate to the database, please follow the two commands.

a.      Open Package Manager Console. Tools Menu => Nuget Package Manager => Package Manager Console

                                                               i.      


b.      This will open the package manager console as below. Two things must be done before adding any commands

                                                              i.      Set your project as the Startup Project. [Right-click on your project => Set As Startup Project]

                                                             ii.      In the Package Manager Console, your project should be the selected project in the Dropdown list

                                                           iii.     


c.       Build your project manually. [Right-click on your project => Build]

d.      In the Package Manager Console, add the following commands

                                                              i.      To create a migration.

1.      Add-Migration

a.      


                                                             ii.      Once this command completes successfully, add in the next command, to generate a database in MS SQL Server Express. The command is as follows

1.      Update-Database

a.       


                                                           iii.      The migration should be successful.

11.  ALTERNATIVE STE. USE IF ABOVE FAILS: If the Package Manager Console commands fail, by showing a build failure even when the Project is compiling properly, please use this method

a.      Open Developer Console. [View Menu => Terminal]

b.      Navigate to your projectDirectory inside the Developer Console.Check if the following command works.

YourProject/> dotnet-ef --version 

                                                              i.      If the above command works, then go to step (c), else follow the next step

YourProject/>dotnet tool install --global dotnet-ef  

c.       Now add the following commands one after another. The below command will create a migration file.

YourProject/>dotnet ef migrations add v1  

d.      The next command below will execute the migration file to create the Database and tables.

YourProject/>dotnet ef database update 

12.  Use either Step (10) or (11). No need to follow both. If the above steps are successful, you can verify whether your database is created in the SQL Server Object Explorer. [View => SQL Server Object Explorer]

                                                               i.