Search This Blog

Friday, 4 July 2025

Quick Tech Tips: Fastest way to Learn Xunit for Beginners

Set up xUnit with.NET 8 for effective unit testing by following these practical steps to create, write, and run tests.

Prerequisites

Before you begin, ensure you have the following installed:
  • .NET SDK 8.0 or later: Download from the official.NET website.
  • Visual Studio (recommended) or Visual Studio Code for easier development and testing.

Creating a New xUnit Project

  1. Open a terminal or command prompt and navigate to the directory where you want to create your project.
  2. Create a new xUnit test project by running the command:
    dotnet new xunit -n MyFirstUnitTests
    
    This will create a new folder named MyFirstUnitTests with the necessary xUnit references.
  3. Navigate into the project directory with:
    cd MyFirstUnitTests
    
  4. Add a class library to test. For example, create a new class library for testing:
    dotnet new classlib -n MyLibrary
    
    This command creates a project that you can later reference in your unit tests.

Writing Your First Test

  1. Add a reference to the class library:
    dotnet add reference../MyLibrary/MyLibrary.csproj
    
  2. Open the UnitTest1.cs file located in the MyFirstUnitTests directory and replace its content with your test code. Here is an example test:
    using Xunit;
    using MyLibrary;  // Replace with your class library namespace
    
    public class UnitTest1
    {
        [Fact]
        public void Test1()
        {
            Assert.True(true);  // Replace true with your condition
        }
    }
    
  3. Run your tests using the command:
    dotnet test
    
    This will compile your tests and execute them, providing you with feedback on which tests passed or failed.

Advanced Testing with xUnit

  • Parameterized Tests: Use the [Theory] attribute combined with [InlineData] to run multiple data variations through a single test method. Here is an example:
    [Theory]
    [InlineData(1, false)]
    [InlineData(2, true)]
    [InlineData(3, true)]
    public void IsPrimeTest(int number, bool expected)
    {
         Assert.Equal(expected, IsPrime(number));  // Implement IsPrime accordingly
    }
    

Running Tests in Visual Studio

If you are using Visual Studio, you can utilize the Test Explorer to run your tests visually:
  1. Open Test Explorer via Test > Test Explorer.
  2. Run tests by clicking the Run All button in the Test Explorer toolbar.

Thursday, 3 July 2025

Docker Compose - Web Api connecting to SQL Server container

One of the modern ways of deploying is using the Lift-And-Shift Mechanism. There are two deployment strategies used in this case

  1. Virtual Machines
  2. Containerization
In this post, we shall explore how to use Docker-Compose to containerize Web Apis that use SQL Server DBMS.

USECASE: The concerned web api needs to be deployed on a different server (container) and the DB to be deployed on a different Server (container)

This is a classic case in the deployment architecture of almost every enterprise product.

TOOLKIT:

Containerization : Multi-container in the same sub-net
Tool for Containerization: Docker-Compose

PRODUCT TECHNICAL SPECS:

API Layer: Web Api, .Net 8.0 runtime
DAL Layer: EF Core, .Net 8.0
UI Layer: Out of Scope for this post. It can be MVC Web App, Angular App, React App, even a console app etc.

DETAILS OF WEB API

Name of Api: ProductService
Model Class name: Product
DBContext Name: ProductServiceContext

MIGRATION STRATEGY

Migrating the DB to configured SQL Server Container (container name: sqlData)

This can be accomplished from scratch, in two prominent steps

  1. Steps to Scaffold Controller with EF Core
    1. Use Visual Studio Rapid Scaffolding to 
      1. install EF Core, 
      2. create actions, 
      3. create dbContext,  using code-first approach
  2. Create the DB in the Docker Container
    1. Configure connection string
    2. Create a Migration Service
    3. Configure docker-compose.yml


 STEPS TO SCAFFOLD CONTROLLER WITH EF CORE

  1. Create "Models" folder
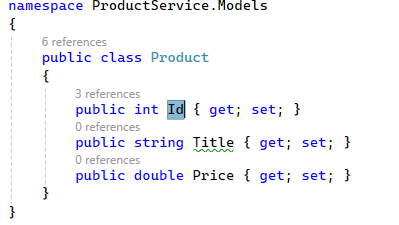
  2. Add a class named "Product". This will be your model class, which will become a table when integrated with a DBMS like SQL Server.
    1. 7fd0ff9a81183c407c8add0949ea94ad.png
  3. Save your project and Build it.
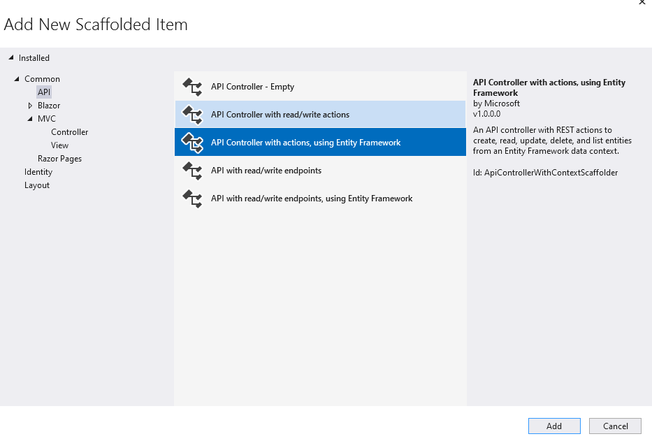
  4. Right Click on Controllers Folder -> Add -> New Controller -> Choose (API Controller in Left Pane) -> Choose API Controller with Entity Framework Actions
    1. bf99c6d4620f8669de07d652f2e872e4.png
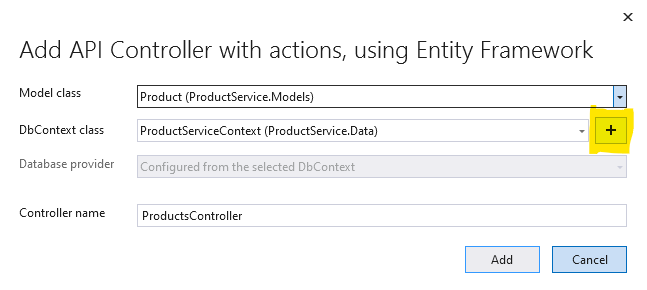
    2. 3a7294644c50d0abffffac80cadde245.png
    3. cd3538003f05694f9ae5f31cf4f056f1.png
    4. Click Add. This will install all required EF Core Nuget Packages and auto-generate
      1. the ProductsController,
      2. The EFCore DBContext Class named ProductServiceContext,
      3. app.config settings

To create the DB in the Docker Container, go ahead with the following steps


  • Create a migration.
    • Build your project
    • Set your WebApi project as the Startup project
    • Open Package Manager Console, verify that the Web Api project is the default project
      • > Add-Migration v1                           

  • Add the following code in the Program.cs file, after the line: var builder = WebApplication.CreateBuilder(args);

    • var server = builder.Configuration["DbServer"] ?? "localhost";
      var port = builder.Configuration["DbPort"] ?? "1433"; // Default SQL Server port
      var user = builder.Configuration["DbUser"] ?? "SA"; // Warning do not use the SA account
      var password = builder.Configuration["Password"] ?? "sa@12345Ok!";
      var database = builder.Configuration["Database"] ?? "ProductsDB";

      //concatenate them into a connection string
      //server, port;Initial Catalog=database;userID=user;password=password
      var connectionString = $"Server={server}, {port};Initial Catalog={database};User ID={user};Password={password};TrustServerCertificate=True;";


      builder.Services.AddDbContext<ProductServiceContext>(options =>
          options.UseSqlServer((connectionString)));


    • After the line: var app = builder.Build(); ADD THE FOLLOWING
      • DbMigrationService.MigrationInit(app);
      • Generate the class and replace with the following code
        • public class DbMigrationService
          {
              public static void MigrationInit(IApplicationBuilder app)
              {

                  using (var serviceScope = app.ApplicationServices.CreateScope())
                  {
                      try
                      {
                          serviceScope.ServiceProvider.GetService<ProductServiceContext>().Database.Migrate();
                      }
                      catch (Exception ex)
                      {
                          Debug.WriteLine(ex.Message);
                      }
                  }
              }
          }


    • Open docker-compose.yml file. Here we will create a new container that will hold the DB. Now add the following configurations. 
      •  sqldata:
              container_name: sqldata
              image: mcr.microsoft.com/mssql/server:2019-latest
              restart: always
              environment:
                  ACCEPT_EULA: "Y"
                  SA_PASSWORD: "sa@12345Ok!"
                  MSSQL_PID: Developer
              ports:
                  - "1433:1433"
      • Append the following in the productservice configuration in the docker-compose.yml
        • environment:
              DbServer: "sqldata"
              DbPort: "1433"
              DbUser: "SA"
              Password: "sa@12345Ok!"
              Database: "ProductsDB"
          depends_on:
            - sqldata

        • The above configuration should be appended as shown in the screenshot below3314ac5cf19393e23bdf7a8532b93919.png

      • Set the docker-Compose Project as your startup project. Run your application.

Wednesday, 19 February 2025

Quick Tech Tips: Relation between TDD & BDD

 Test-Driven Development (TDD) and Behavior-Driven Development (BDD) are both software development methodologies focused on ensuring quality and correctness, but they have some key differences and relationships:

TDD (Test-Driven Development)

  • Focus: TDD focuses on writing tests before writing the actual code.

  • Process:

    1. Write a Test: Write a test for a new feature or functionality.

    2. Run the Test: Run the test and see it fail (since the feature/functionality doesn’t exist yet).

    3. Write Code: Write the minimum amount of code required to make the test pass.

    4. Refactor: Refactor the code for optimization and maintainability.

    5. Repeat: Repeat the process for new features or improvements.

  • Tests: TDD typically involves writing unit tests that test individual components of the software.

BDD (Behavior-Driven Development)

  • Focus: BDD extends TDD by focusing on the behavior of the application from the user’s perspective. It emphasizes collaboration between developers, testers, and non-technical stakeholders.

  • Process:

    1. Define Behavior: Define the desired behavior of the application using plain language (Gherkin) in the form of features and scenarios.

    2. Write Tests: Translate the defined behavior into executable tests (often automated).

    3. Develop Code: Write the code to make the tests pass.

    4. Refactor: Refactor the code for optimization and maintainability.

    5. Repeat: Repeat the process for new behaviors or improvements.

  • Tests: BDD involves writing acceptance tests that describe how the application should behave in various scenarios.

Relationship between TDD and BDD

  • Complementary: BDD can be seen as an evolution or extension of TDD. While TDD focuses on the technical aspects and internal correctness of the code, BDD emphasizes collaboration and understanding the business value and user behavior.

  • Layered Approach: In a BDD practice, TDD is often used to write unit tests for individual components, while BDD is used to define and verify the overall behavior of the system through acceptance tests.

  • Common Goal: Both methodologies aim to produce high-quality, reliable software by ensuring that code is thoroughly tested and meets the requirements.

In summary, while TDD and BDD have different focuses and processes, they can be used together to achieve a comprehensive approach to software development and testing. By combining the strengths of both methodologies, teams can ensure that the software is both technically sound and aligned with user expectations.


Thursday, 1 August 2024

CoreWCF - Service and client creation step by step

 CoreWcf is used with .Net Core versions. Let us see how a simple WCF service and its client can be created using BasicHttpBinding

Creating the Server Side Setup - Core WCF Service Application

Step 1: Create a new core Wcf application 

> dotnet new web -n CoreWcfServer

> cd CoreWcfServer

At this point a basic boiler-plate code with a service contract and data contract is generated in the project as shown in the screenshots

Data Contract

Service Contract


Step 2: Make sure the following packages are installed. If not install them using the given command.

> dotnet add package CoreWCF.Http

> dotnet add package CoreWCF.Primitives


Step 3: In Program.cs make sure you add the highlighted lines in the screenshot. 

            Make a note of the Binding used at line: 12 - BasicHttpBinding(BasicHttpSecurityMode.Transport)


Step 4: Run the service project. Browse to: https://localhost:7104/MetaData 

This completes the configuration for a Core Wcf Service Application project


Creating a Console Client

The bindings exposed by the core WCF app can only be used by the client application. In this case, BasicHttpBinding can be the only binding that can be used

Step 1: Create a console app

> dotnet new console -n WcfConsoleClient

> cd WcfConsoleClient

Step 2: Make sure the same nuget packages are installed for this project, as installed for the WCF app.

             The server and client apps should contain the same ServiceModel packages

> dotnet add package System.ServiceModel.Primitives

> dotnet add package System.ServiceModel.Http

Step 3: Auto-generate the service reference to the Wcf Service app. For this we will require to install the tool dotnet-svcutil. This will help generate the service reference (proxy class), the metadata using which the calls to the service can be made

> dotnet tool install --global dotnet-svcutil

> dotnet-svcutil https://localhost:7104/MetaData?wsdl

** Some antiviruses can block the bootstrapperutil module in dotnet-svcutil, as it is not a signed module. Hence, use the following option

> dotnet-svcutil https://localhost:7104/MetaData?wsdl --noTypeReuse


Step 4: Add the following code in Program.cs


using ServiceReference;

using System.ServiceModel;


var binding = new BasicHttpBinding(BasicHttpSecurityMode.Transport);

var endpoint = new EndpointAddress("https://localhost:7104/Service.svc");


var channelFactory = new ChannelFactory<IService>(binding, endpoint);

var client = channelFactory.CreateChannel();


CompositeType result = await client.GetDataUsingDataContractAsync(new CompositeType() { BoolValue=true, StringValue="A new string"});

Console.WriteLine($"Result from service: {result.StringValue} - {result.BoolValue}");


((IClientChannel)client).Close();

channelFactory.Close();

Console.ReadKey(); 


Step 5: Run your Wcf Service App first, then run the WcfConsoleClient


Wednesday, 10 January 2024

Quick Tech Tips - Attaching a Logger middleware to Redux

 To add a logger middleware to the redux application, the following steps can be followed

1. Install 'redux-logger' locally for your project


2. The file where redux store is created in your application, make the changes as follows (marked yellow)

import {configureStore, combineReducers} from '@reduxjs/toolkit'
import { purchaseReducer } from '../Reducers/Reducer';
import logger from 'redux-logger';

const rootreducer = combineReducers({purchaseReducer});
export const shop = configureStore({
                                    reducer:rootreducer,  
                                    middleware:(getDefaultMiddleware) => getDefaultMiddleware().concat(logger)}
                                 );

3. That's it. Each time you alter a state, The output should look as follows


Quick Tech Bits - React Redux Integration Using Hooks

 Steps to create and integrate Redux Application with React using @reduxjs/toolkit and Hooks

1. To create a redux aware react app, the following installations are required.

2. Create the actions, reducers, store as follows   

Actions > Action.js

 
export const BUY_ICE = 'BUY_ICE';
export const BUY_CHOC = 'BUY_CHOCOLATE'
 
//Create actions
export const buyicecream = () => {
    return {
        type: BUY_ICE
    }
}


Reducers > Reducer.js

import { BUY_ICE, buyicecream } from "../Actions/Actions";

const initialState = {
    ice_stock: 100
}

export const purchaseReducer = (prevState = initialState, action) => {
    switch(action.type){
        case BUY_ICE:
           return {
                    ...prevState,
                    ice_stock: prevState.ice_stock-1
                 };
        default:
            return prevState;
    }

}


Store.js

import {createStorefrom 'redux'
import {configureStore, combineReducers} from '@reduxjs/toolkit'
import { purchaseReducer } from '../Reducers/Reducer';
 
const rootreducer = combineReducers({purchaseReducer});
export const shop = configureStore({reducer:rootreducer});
//export const shop = createStore(reducer); //Deprecated...


3. Create a react component. In this component import the new hooks "useDispatch", "useSelector". These hooks come from the library 'react-redux'. They perform the task of mapping the redux library's dispatch function to react component, mapping redux store object to react component respectively, as shown in the code below.

In this react component, a button that updates the icecream stock of the redux's store (as created above) is done.

import {useDispatch, useSelector} from 'react-redux';
import { buyicecream } from './Actions/Actions';

export let MyShop = ()=>{

    const dispatchfn = useDispatch();   //redux built-in dispatch fn to dispatch action to redux store thru reducer
    const shopData = useSelector(store => store.purchaseReducer);   //assign redux global store (state obj) to variable
    console.log(shopData);

    return(<>
        <div className='text-primary'>
            Ice cream Stock: {shopData.ice_stock}
        </div>
        <button className='btn btn-primary' onClick= {()=>dispatchfn(buyicecream())}>BUY ICECREAM</button>

    </>);
}


4. Add this to the index js or the route configuration in your react app. This component will be wrapped inside the <Provider> which is provided by 'react-redux' package.

import {shop} from './Store/store' //comes from redux's store created above
import {Provider} from 'react-redux';
import { MyShop } from './ReduxIntegration'; //react component

let ReduxComponent = () =>{
    return (
        <Provider store={shop}>
            <MyShop/>
        </Provider>
    )
}

//In the route configuration add it as follows
export let Container = () => {
    return(
        <BrowserRouter>
            <Routes>                           
                <Route path='/redux' element={<ReduxComponent/>}/>
            </Routes>
        </BrowserRouter>
    )
}


5. Finally add it to the correct virtual DOM in index.js as shown.

Index.js


const root = ReactDOM
                    .createRoot(document
                                  .getElementById('root'));

root.render(
  <React.StrictMode>  
   <Container/>
  </React.StrictMode>
);
To execure, be sure you have navigated to your project directory from command terminal  


This completes the integration, using Hooks and the @reduxjs/toolkit


When executed, the output should look as follows

CLICK BUY ICECREAM         


Wednesday, 22 November 2023

Using Git from Visual Studio

 Working with Git in Visual Studio  (Step-By-Step)

Step 1:  Create your repository in Git. Use Visual Studio


THE ABOVE STEP NEEDS TO BE DONE ONLY ONCE.

Step 2:  Open your solution in Visual Studio. Open the Git Changes Window


3.  Create the repository, through Create Repository Option in Git Changes window


Step 4. The files that do not exist in the repository (remote: github.com repo) would show in Changes section. 

    i. Click '+' to Add them. 

    ii. Stage Them (Click Commit All / Commit Staged)

    iii. Add a Comment for changes made, the choose the button to Push the changes to remote repo (viz. repo on Github.com)


This completes the creation of a new repository in Github using Visual Studio


5. HEREAFTER, EACH TIME YOU OPEN VISUAL STUDIO TO WORK ON YOUR PROJECT, 

a. First PULLthe changes from Github on your local machine

b. Make necessary changes. Look for the shown icon, in the Git Changes window, (beside the Push icon)

c. Once again PULL the changes from Github, to ensure nobody has added anything new to the repository

d. Follow Step 4