Search This Blog

Thursday, 3 July 2025

Docker Compose - Web Api connecting to SQL Server container

One of the modern ways of deploying is using the Lift-And-Shift Mechanism. There are two deployment strategies used in this case

  1. Virtual Machines
  2. Containerization
In this post, we shall explore how to use Docker-Compose to containerize Web Apis that use SQL Server DBMS.

USECASE: The concerned web api needs to be deployed on a different server (container) and the DB to be deployed on a different Server (container)

This is a classic case in the deployment architecture of almost every enterprise product.

TOOLKIT:

Containerization : Multi-container in the same sub-net
Tool for Containerization: Docker-Compose

PRODUCT TECHNICAL SPECS:

API Layer: Web Api, .Net 8.0 runtime
DAL Layer: EF Core, .Net 8.0
UI Layer: Out of Scope for this post. It can be MVC Web App, Angular App, React App, even a console app etc.

DETAILS OF WEB API

Name of Api: ProductService
Model Class name: Product
DBContext Name: ProductServiceContext

MIGRATION STRATEGY

Migrating the DB to configured SQL Server Container (container name: sqlData)

This can be accomplished from scratch, in two prominent steps

  1. Steps to Scaffold Controller with EF Core
    1. Use Visual Studio Rapid Scaffolding to 
      1. install EF Core, 
      2. create actions, 
      3. create dbContext,  using code-first approach
  2. Create the DB in the Docker Container
    1. Configure connection string
    2. Create a Migration Service
    3. Configure docker-compose.yml


 STEPS TO SCAFFOLD CONTROLLER WITH EF CORE

  1. Create "Models" folder
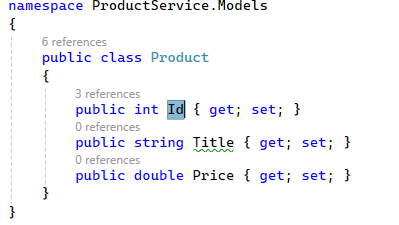
  2. Add a class named "Product". This will be your model class, which will become a table when integrated with a DBMS like SQL Server.
    1. 7fd0ff9a81183c407c8add0949ea94ad.png
  3. Save your project and Build it.
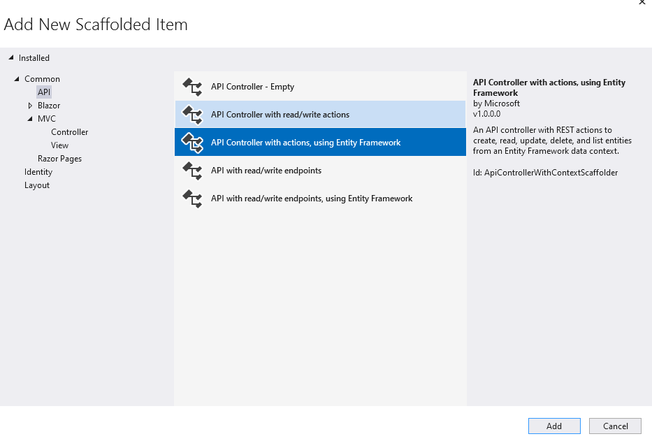
  4. Right Click on Controllers Folder -> Add -> New Controller -> Choose (API Controller in Left Pane) -> Choose API Controller with Entity Framework Actions
    1. bf99c6d4620f8669de07d652f2e872e4.png
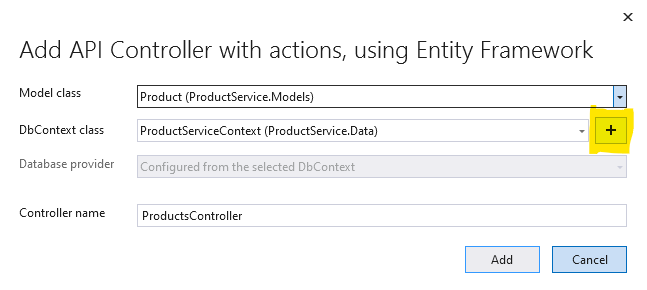
    2. 3a7294644c50d0abffffac80cadde245.png
    3. cd3538003f05694f9ae5f31cf4f056f1.png
    4. Click Add. This will install all required EF Core Nuget Packages and auto-generate
      1. the ProductsController,
      2. The EFCore DBContext Class named ProductServiceContext,
      3. app.config settings

To create the DB in the Docker Container, go ahead with the following steps


  • Create a migration.
    • Build your project
    • Set your WebApi project as the Startup project
    • Open Package Manager Console, verify that the Web Api project is the default project
      • > Add-Migration v1                           

  • Add the following code in the Program.cs file, after the line: var builder = WebApplication.CreateBuilder(args);

    • var server = builder.Configuration["DbServer"] ?? "localhost";
      var port = builder.Configuration["DbPort"] ?? "1433"; // Default SQL Server port
      var user = builder.Configuration["DbUser"] ?? "SA"; // Warning do not use the SA account
      var password = builder.Configuration["Password"] ?? "sa@12345Ok!";
      var database = builder.Configuration["Database"] ?? "ProductsDB";

      //concatenate them into a connection string
      //server, port;Initial Catalog=database;userID=user;password=password
      var connectionString = $"Server={server}, {port};Initial Catalog={database};User ID={user};Password={password};TrustServerCertificate=True;";


      builder.Services.AddDbContext<ProductServiceContext>(options =>
          options.UseSqlServer((connectionString)));


    • After the line: var app = builder.Build(); ADD THE FOLLOWING
      • DbMigrationService.MigrationInit(app);
      • Generate the class and replace with the following code
        • public class DbMigrationService
          {
              public static void MigrationInit(IApplicationBuilder app)
              {

                  using (var serviceScope = app.ApplicationServices.CreateScope())
                  {
                      try
                      {
                          serviceScope.ServiceProvider.GetService<ProductServiceContext>().Database.Migrate();
                      }
                      catch (Exception ex)
                      {
                          Debug.WriteLine(ex.Message);
                      }
                  }
              }
          }


    • Open docker-compose.yml file. Here we will create a new container that will hold the DB. Now add the following configurations. 
      •  sqldata:
              container_name: sqldata
              image: mcr.microsoft.com/mssql/server:2019-latest
              restart: always
              environment:
                  ACCEPT_EULA: "Y"
                  SA_PASSWORD: "sa@12345Ok!"
                  MSSQL_PID: Developer
              ports:
                  - "1433:1433"
      • Append the following in the productservice configuration in the docker-compose.yml
        • environment:
              DbServer: "sqldata"
              DbPort: "1433"
              DbUser: "SA"
              Password: "sa@12345Ok!"
              Database: "ProductsDB"
          depends_on:
            - sqldata

        • The above configuration should be appended as shown in the screenshot below3314ac5cf19393e23bdf7a8532b93919.png

      • Set the docker-Compose Project as your startup project. Run your application.